
Just like teaching and learning, there’s no “one-size-fits-all” approach to assistive technology (AT).
Assistive technology refers collectively to the tools, devices, and software that help students of all ages overcome challenges related to learning. Examples of assistive technology include low-tech items like graphic organizers and pencil grips to high-tech items such as talking calculators, alternative keyboards, speech recognition software, and text to speech, just to name a few.
The use of assistive or adaptive technology in the classroom has grown exponentially in recent years, as has the menu of offerings available. Technology is advancing quickly, producing numerous tools designed to address the equally broad range of abilities. As a result, educational institutions and classroom teachers now have more high-tech options than ever to offer learners.
But the sheer number of devices can in and of itself become a hindrance, making it difficult to know which tools will benefit your student population the most — and how they work together.
If you’re struggling to figure out how to level the playing field and provide students with a more personalized, accessible learning experience — specifically as it applies to digesting and learning from online content — use the guide below. It offers a complete framework for selecting assistive technology solutions that do more than just help you comply with accessibility rules and guidelines; they truly address the unique challenges of your diverse learners.
Let’s dig in.
Thinking of offering learners a text to speech option? See how ReadSpeaker compares to other, similar tools and what to pair it with for the strongest approach to accessibility.
Table of Contents:
Assistive Technology Classroom Tools: What type of AT do you need?
Basic Requirements For Making Your Shortlist
Deeper Dive Aspects: Determining The Best Fit
Assistive Technology Classroom Tools: What type of AT do you need?
The first step is to think about the type (or types) of tool you need. In general, AT tools fall into one of three general categories:
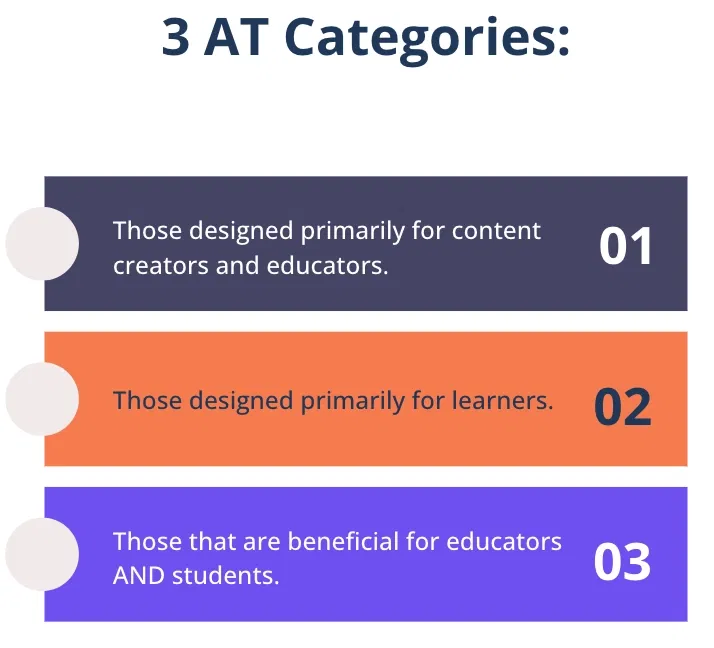
#1: Those that are designed primarily for content creators and educators.
These tools help educators make the content within their courses accessible, for instance by identifying accessibility barriers and suggesting changes. An accessibility checker is a good example of this type of tool. It examines lesson and homework content for accessibility issues—missing headers, small font, etc.—before the content is published so educators can take action to make their web pages and documents more accessible.
#2: Those designed primarily to assist students.
These tools help students with disabilities consume online content more effectively. Common examples are screen readers and alternative input devices. Screen readers help learners with visual impairments to navigate the computer interface on their own. Alternative input devices provide alternative ways for learners to interact with computers, bypassing traditional keyboards and mice. They are particularly helpful learning aids for people with motor impairments. Examples include voice recognition software (like Dragon NaturallySpeaking), eye-tracking devices, and switches.
#3: Those that are beneficial for educators AND learners.
These tools aid educators in making learning more accessible and also assist learners in digesting content.
One example is text-to-speech software, like ReadSpeaker, which instantly reads online text aloud. Educators can also use it to quickly make voice overs for online learning content or create narrations that go along with text documents.
It’s also perfect for people with ADHD, dyslexia, learning and cognitive disabilities, and visually impaired learners, as well as people without disabilities who prefer consuming content in audio format. It also comes with a variety of study tools that can benefit everyone.
LMS accessibility tools also fall into this category, such as Anthology Ally, Cidi Labs UDOIT, and Panorama. Using these types of technology in the classroom aids teachers in providing accessible material, and also helps learners by providing alternative content formats and sometimes instant read-alouds as well.
Two aspects to consider when thinking about categories:
Some AT tools have very broad reach.
One in ten children worldwide has a disability. Assistive technology is specifically designed to support these individuals by increasing accessibility to digital content. Typically, the appropriate AT devices are identified as part of a student’s individualized education program.
For example, a blind person or someone with low vision would have difficulty navigating a computer interface or consuming online course material without a screen reader. And a student with ADHD would struggle to learn from online content without the help of text-to-speech software. It’s imperative to provide disabled students with the appropriate assistive technology to help them succeed.
But it’s important to remember that assistive technology tools can also benefit learners without specific learning disabilities. They may simply need reading support, for instance, and would benefit from dictionary tools, read-along highlighting, or text to speech. And approximately two-thirds of people are multimodal learners, which means they’re most successful when information is presented in more than one way, such as in print (online) and via voice. Some AT tools have additional functionality that can go a very long way toward creating an inclusive learning environment for everyone.
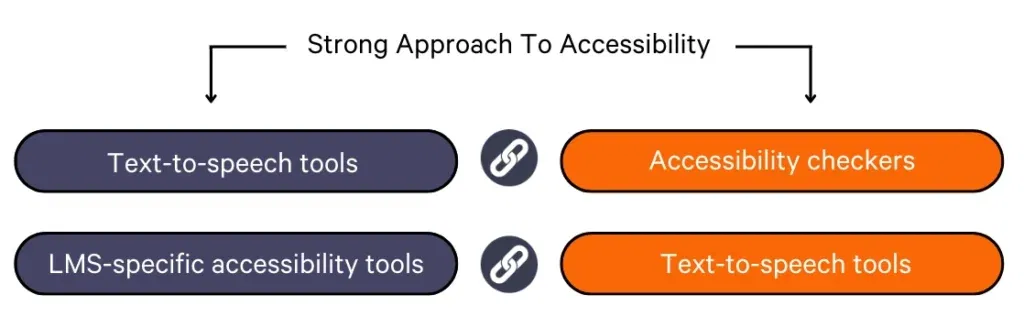
Sometimes, choosing multiple tools is the best option.
Secondly, don’t think of these categories as mutually exclusive. Very often, AT devices are complementary; by offering more than one you can significantly improve accessibility across your student population.
For example, individual learners may enjoy using two tools together—as in the case of screen readers and text-to-speech tools, for instance—to take advantage of the strengths of both options. And an LMS-specific accessibility tool, such as Cidi Labs UDOIT, pairs well with text-to-speech software so learners can have the optimal learning experience across ALL digital learning content, even when they’re working outside your LMS.
Checklist:
1. Understand the needs of your learners and your institution.
❑ Review any available assessments across your institution to get an overall picture of students’ learning needs, including their strengths, challenges, learning styles, and goals.
❑ Note the characteristics of the online content offered by your institution. Do your educators produce original online content? Is most online content consumed via an LMS?
2. Who will be using the assistive technology? Determine the target audience of the future tool. Is it:
❑ For educators? (to help them make accessible course content)
❑ For learners? (to digest written text online)
❑ For educators AND learners? (to improve the creation and digestion of online content)
3. Devise a list of possible options that are most likely to address your needs.
Download the complete evaluation checklist to make sure your next assistive technology purchase is the best match for your learners and your school!
Basic Requirements For Making Your Shortlist
Once you’ve reviewed any available assessments and identified the types of assistance that would be most helpful for your institution, it’s time to take a closer look at the product (or products) you’re considering.
Any tool should meet the basic requirements below to make your shortlist. If it doesn’t meet these requirements, implementation will be difficult if not impossible.
- It must be user-friendly. If a tool is difficult to use or navigate (for teachers as well as learners), it’s less likely to be adopted and used effectively in the classroom. Look for tools with clean, intuitive interfaces; clear instructions; and built-in support features.
- It must integrate with your existing systems. Seamless integration is crucial. Assistive technology shouldn’t exist in a silo. It should integrate smoothly with your learning management system (LMS), student information system (SIS), and any other platforms you use. This streamlines workflows and ensures that data can be easily shared across systems.
- It must be accessible on all types of devices and compatible with multiple operating systems and browsers. In districts where a BYOD (Bring Your Own Device) policy exists, it’s essential that assistive technology tools are cloud-based and work across a range of devices—desktops, laptops, tablets, smartphones—as well as across different operating systems and browsers. This allows learners to access support wherever and whenever they need it, promoting flexibility and personalized learning. Cloud-based tools are also perfect for schools and districts looking to minimize the security risks associated with BYOD, as they don’t require installation on individual devices.
- The vendor must offer excellent customer support. Don’t underestimate the importance of robust support. Choose vendors that offer comprehensive training resources, responsive customer service, and ongoing technical assistance. This will ensure that you can troubleshoot problems quickly and maximize the return on your investment.
- It must be within your budget. In education, tight budgets are a fact of life. Evaluate whether the expense fits into your annual budget and how big of an impact it would make on your learners. Only invest in solutions that tackle the biggest obstacles for them, and that align with your goals. (“Free” tools will of course be within your budget, but keep in mind that they may cost you in other ways, such as time, and ultimately be of limited usefulness.)
- It must be a good fit in terms of human resources. One of the most important factors to consider when implementing new assistive technology in schools is the human element—people can make or break its success. If it’s too difficult to use, most people simply won’t use it. This underscores the user-experience factor mentioned previously. Will your educators buy into the need for the software? Will they be willing and able to quickly get up to speed to aid learners who need instruction and help? Do educators themselves need training on how to use it, and will the vendor supply it? All of these are crucial questions to consider in relation to the product you’re considering.
Checklist:
Generate a short list of options by evaluating:
❑ User experience. See which tools are easiest to use and navigate.
❑ Integrations. See which tools will mix with your existing technology stack, such as your learning management system, student information system, etc.
❑ Device compatibility. Determine which tools work across a range of devices (desktops, tablets, phones) and operating systems.
❑ Vendor support. Which vendors offer comprehensive training resources, responsive customer service, and ongoing technical assistance?
❑ Price point. Which tool(s) fit within your budget?
❑ Human resources. How likely is it that each of these tools will be embraced by your educators and learners?
Download the complete checklist here to ensure your next AT investment is a success.
Deeper Dive Aspects: Determining The Best Fit
You’re starting to home in on the best tools for your school! Now it’s time to evaluate your list of top choices by digging deeper into the below aspects for each option. Taking the time to learn more about the tools will help you make a more informed decision as to how much value they’re likely to bring to your school over time.
- What is its long-term value? When making decisions about assistive technology investments, consider the long-term value and sustainability of the solution. While a free tool might seem appealing initially, it may have limitations in terms of features, support, and accessibility. Investing in robust, premium solutions can often be more cost-effective in the long run.
- Does the vendor offer trial periods and pilots? It should. Be sure to take advantage of trial periods and pilot programs offered by vendors. This allows you to test the tools in your specific environment and gather feedback from learners and educators before making a larger investment. You should expect that the vendor will provide materials to help you assess the tool’s usage and performance within your learning environment throughout the trial period. You can gauge what a future partnership would be like by their presence and helpfulness during this time.
- Is it a scalable, flexible tool? Choose solutions that can scale to meet the evolving needs of your student population. Consider factors such as the ability to add new users, integrate with other systems, and customize features. You don’t want to have to invest in a costly new tool a year from now simply because it can’t accommodate changes in technology or the volume of users at your school.
- Does it have a track record of success at other schools? Has the vendor demonstrated success with this product in other schools? If possible, talk with other educators using the technology to understand the impact it’s had on their student population.
Checklist:
❑ Long-term value. Is the tool robust enough to serve you well?
❑ Trial periods. Take advantage of the trial period, and gather feedback from teachers and learners.
❑ Scalability and flexibility. Is it flexible enough to integrate with new tools and can it easily accommodate more (or fewer) learners?
❑ Track record. Ask for evidence of the tool’s effectiveness. If possible, talk with other educators using the technologies.
Checking The Fine Print
Implementation, functionality, and a supportive vendor are key to choosing the right AT. But there are also a few aspects that tend to be a little tricker to untangle, and may require further research or deeper conversations with the vendor.
Before you invest in a product, it’s critical to ensure you have a good understanding of the below in order to ensure a good outcome for your school:
- Will it help you comply with WCAG? Ensure that any assistive technology you choose complies with the Web Content Accessibility Guidelines (WCAG). These guidelines provide a set of standards for making digital content accessible to people with disabilities. Compliance with WCAG is not only essential for inclusivity but also helps you avoid legal challenges. Be wary of excessive claims in this area, however. Some accessibility overlay providers, for instance, claim to guarantee full compliance with WCAG, but most experts agree that this isn’t possible with just one single tool. Make sure the providers you speak with are realistic in terms of their reach in this area.
- How secure is the software? Data privacy is paramount. Be aware of how assistive technology tools collect, store, and use student data. Ensure that the tools you select comply with relevant data protection regulations, such as the General Data Protection Regulation (GDPR). Also remember that so-called “free” tools often sell users’ data to third parties—yet another reason to be wary of them.
- In the case of free tools, what are their limitations? Speaking of free… While these types of assistive technology tools can be helpful in some cases, they often come with limitations. They may have fewer features, limited support, or display advertisements. Carefully evaluate the pros and cons of free versus paid solutions to determine the best fit for your needs.
- How much will it really cost? Understand the pricing model of your chosen AT tool (or tools). Many products have volume- or usage-based pricing. One thing you can count on is that usage patterns will inevitably spike occasionally. When pricing is tied to these metrics it can lead to higher costs. License-based pricing models usually are the best solution for controlling costs, though that’s not necessarily true in all contexts. With all that in mind, the tool you choose should have flexible pricing models and a vendor who’s willing to work with you on a pricing structure that best matches your individual needs.
Checklist:
❑ WCAG compliance. Will it help you comply with web content accessibility guidelines?
❑ Data security measures. How does it collect, store, and use student data? And does it comply with relevant data protection regulations?
❑ Limitations (for free tools). Will fewer features, limited support, or display advertisements hinder its usefulness?
❑ Pricing model. Look for a flexible, customizable pricing model, preferably one that is licensed-based rather than volume- or usage-based.
Future-proof Your Investment
Lastly, you need to ensure your chosen tool will be able to adapt to the changing needs of your learners and the evolving environment of your institution. To make sure a tool offers more than just immediate benefits, ensure it meets these requirements:
- It is mobile-friendly. Mobile devices are increasingly becoming central to learning. Choose assistive technology solutions that are mobile-friendly and offer dedicated apps for iOS and Android devices. This allows learners to access support on their preferred devices and learn on the go.
- It fosters long-term user engagement. User experience (UX) is becoming increasingly important in educational technology. Look for assistive technology tools with engaging interfaces, personalized features, and gamified elements that motivate learners and enhance their learning experience.
- It’s built with interoperability in mind. The future of assistive technology lies in seamless integration with other emerging technologies, such as artificial intelligence (AI) and virtual reality (VR). Choose solutions that are built with interoperability in mind, allowing them to connect with future tools and platforms. This minimizes the back-and-forth of technology tools for users, and makes the experience more familiar, which in turn encourages usage.
- It offers numerous linguistic options. Make sure the tool supports a wide variety of languages, dialects, and accents. As noted in the Universal Design for Learning Guidelines, offering multiple representations, especially for key information or vocabulary, is an important aspect of accessibility. While one particular language might be dominant in your school or district, cultivating respect across languages and dialects requires recognizing that other languages and linguistic representations are valid and valued — the right tool can help you do that.
- The vendor has a reputation for being a good partner. The vendor’s reputation and strategic fit are essential considerations if you want a tool that will serve you well over the long-term. What is the fundamental character of the company? What values are the driving force behind its business strategy? Are its practices ethical? All of these are important considerations if you hope to succeed in continuing to navigate the ever-changing educational landscape and the needs of your learners. Make sure the company has a partner-focused mindset, meaning they freely share their expertise, are willing to adapt their product to your needs (not the other way around), and genuinely care about your success.
- It supports your broader goals. If applicable, consider how well an AT tool supports your school or district’s overarching goals, like improving digital literacy or enhancing student learning with technology. Goals like these usually span years, and can help improve the ROI of your purchase.
Checklist:
❑ Is it mobile-friendly?
❑ Does it foster long-term user engagement? (personalization, gamification elements)
❑ Does it offer numerous linguistic options?
❑ Does the vendor have a reputation for high-quality expertise, customization options, and support?
❑ Does it support your broader institutional goals?
Learn More About Assistive Technology For Education
This guide was created to help you put together a powerful ecosystem of tools that provide all students with an equal opportunity to access information.
Download the full checklist for evaluating AT here.
ReadSpeaker’s own text-to-speech tool benefits learners with ADHD, dyslexia, visual impairments, and learning disabilities; it also helps learners without disabilities who prefer having online content read aloud. Educators can also use ReadSpeaker to quickly make voice overs for online learning content or create narrations that go along with text documents.
Digital accessibility was our founding mission, and we’ve been developing high-quality TTS voices and tools for well over two decades. To learn more about ReadSpeaker, talk with someone on our expert team.
For additional information on how to choose the right assistive technology for your classroom, refer to these other helpful resources:
Organizations:
Center on Inclusive Technology & Education Systems
Assistive Technology Industry Association
Association for the Advancement of Assistive Technology in Europe
National Center on Accessible Educational Materials for Learning
Articles:
Where Does ReadSpeaker Fit In The Landscape Of Assistive Tech For Education?
Using Technology for learners in Special Education: What the Feds Want Schools to
Four questions to ask before choosing technology in education
Sustainable Text-to-Speech Pricing for Education
Amy Foxwell is an education technology strategist with over 20 year’s deep expertise in accessibility and digital inclusion.
At ReadSpeaker, she helps schools, universities, and corporate learning teams integrate text-to-speech solutions that improve outcomes, support diverse learners, and ensure compliance with accessibility standards.
Amy’s work is driven by a belief that every learner—whether in the classroom, on campus, or in the workplace—deserves equal access to knowledge, and that thoughtful use of technology can make that possible.


